In September I made a new video to introduce the Library in 60 seconds. It was designed to be played in short Induction talks, and to be embedded in various online guides. The whole thing took around 4 hours to do (albeit spread across a couple of days) and it turned out pretty well - before we go through the step-by-step process here's the video:
Step 1: Script-writing
Because we were also producing a longer virtual tour, I knew from the start this would be only one minute long. This was surprisingly non-limiting in the end: once you accept you can't go into detail on anything, it becomes quite easy to write a friendly voice-over that introduces a number of key points in quick succession. The purpose of the video was to provide an overview, help students understand the basics, and encourage them to ask for help. So a brief script was worked up with that in mind, and I shared it with a colleague for a second opinion, then with the narrators.
I wanted Yorkshire voices for this introduction to a Yorkshire library, and I wanted people who were friendly and informal, and I wanted it to be a man and a women ideally. Happily my first choice voice-over artists (Sarah Peace from IT and Martin Philip from Academic Liaison) said yes when I asked them to do it!

Step 2: Voice-over recording
The hardest thing about recording narration is finding a suitable acoustic in which to record. Even small meeting rooms in our building seem to be echoey, and although the Linguistics Department does have an audio booth we can get access to, it wasn't available in our time frame. In the end we chose quite a big room that has enough in it to absorb any resonance, leaving us with an acceptable sound quality.
I recorded my narrators on my own laptop using Audacity, a freely available audio-editing tool, and an entry-level Blue Snowball mic I use for webinars. It took 40 minutes to record both this script and the Virtual Tour script, and the main issue was making sure the narrators were close enough to the mic.
Audacity is incredibly simple to use. You can zoom right in on the visual representation of the audio-waves and easily identify what talking and what is not - for example, in-breaths before a word. Breaths and pauses can be selected, highlighted, and deleted. For this reason, there was absolutely no need to aim for a perfect take of the narration. Each narrator took their time delivering their section, re-running any sentence they weren't happy with. It then took me perhaps 20 minutes to edit the audio into one seamless narration, and export it as an MP3 file to add to the video.
 |
| The audio for the voice-over, as displayed by Audacity |
Step 3: Creating the video with Videoscribe
The process of creating a video with this software is to add objects to the canvas (a little bit like you might with Prezi) and then decide how they are animated, and when. So for example you can just type text in and have a hand or pen 'write' the text at the speed of your choosing, or you can add photographs which can either be 'drawn' or pushed into frame by a hand, or just appear. You put all this together, add music and a voice over you if you wish, and you have a video.I've tended to always build towards a final picture that includes everything the viewer has just seen - so you see each section as it's added, and then at the end you zoom out to see everything at once. But you don't have to use this approach - you can stay buried in the detail if that helps you tell your story.
The VideoScribe interface looks like this:

The main part of the screen displays everything that will appear in the video, but the boxes along the bottom are how you dictate when objects arrive, how they enter the video, and in which order.
Here's a closer shot of that:

All those icons - the phone, the thumbs up, the wifi symbol etc - are from VideoScribe itself. There's also some writing, and (in the middle) a screengrab of the library catalogue.
Absolutely key to a good VideoScribe video, in my experience, is the 'Set Camera to Current Position' button I've highlighted here:

This allows you to control what the camera sees, meaning you can have multiple objects in the frame at once. For example at the end of the video there's a big smiley face and the #UoYTips text added: by default the camera would zoom in so these filled the frame, meaning you could only really see them. But by setting the camera to the same position for the last three sections of the video, you get to see the entire library map, AND the smiley face / #UoYTips in the same shot.
The whole process of creating the video took around 2 hours: trust me, this is REALLY quick for making video content!
Step 4: Exporting to YouTube
I exported two versions of the video: one directly to YouTube, and one as an MP4 file to embed directly into the Induction PowerPoint presentation me and my colleagues would be using throughout the first week of term.
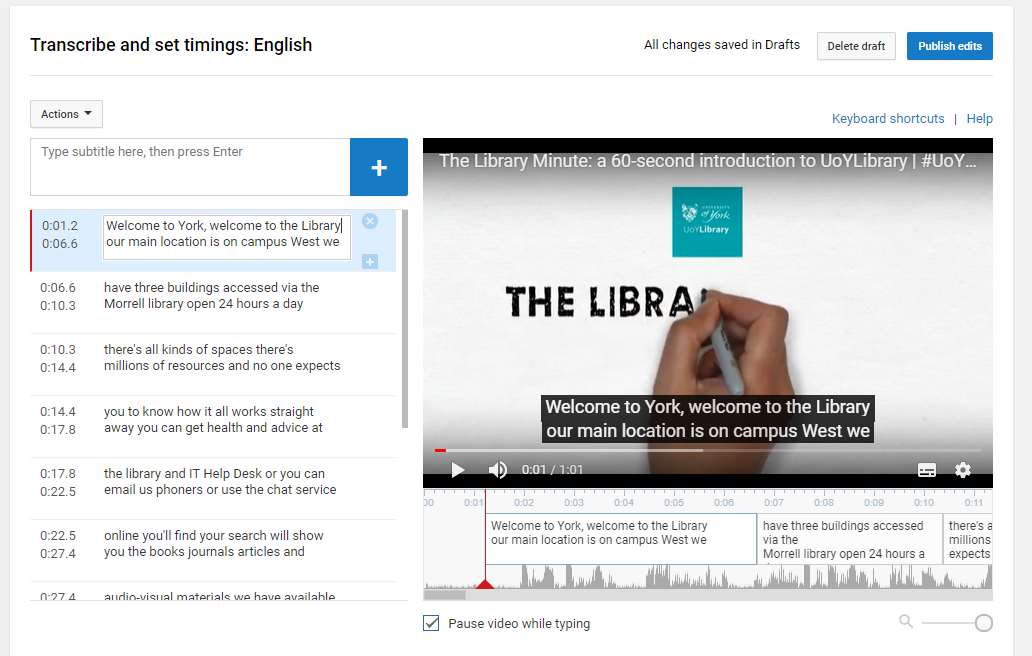
With the YouTube version there was probably around half an hour of faffing involved - writing the description, title, all the keywords, and so on, and editing the subtitles. YouTube's auto-generated subtitles are actually pretty good, but they contain no punctuation or capitalisation and sometimes get names or other words wrong - in screenshot below you can see it says 'you can get health and advice' which I had to edit to 'help and advice':
It's a relatively quick job and of course well worth doing to make sure your video is accessible.
If you've watched the video above you'll have seen that the narration ends at least 10 seconds before the end - this is because I wanted space to link to another video (the more detailed virtual tour), a clickable thumbnail of which appears in the bottom left of the screen. This was achieved by inserting in YouTube itself, via the End Screens menu. As you can see below, the video itself is designed to receive the thumbnail in that exact position, with the arrow pointing to it.

One final piece of admin was to create a custom Thumbnail for the Library Minute video itself. YouTube auto-generates three for you - normally none of them quite work as an encapsulation of the video, so you have to make your own (either from scratch or, more often in my case, just by taking a screenshot of the video at the best possible moment).

Step 5: Promotion
Even though the video is a piece of marketing, it still needed to be marketed... I saved a version for adding to Induction slides, and then created a slide in which it was embedded for everyone to add to their presentations.We also tweeted it, put it on Instagram (where it did much less well than I expected, interestingly) and embedded it on key web pages such as our Info For New Students page.
And that's it! Videoscribe is a tool which we pay for on an annual basis - we don't often do this with so many great free tools available, but we feel it's worth it in this case. If you have any questions about the software or the video above, let us know in a comment...